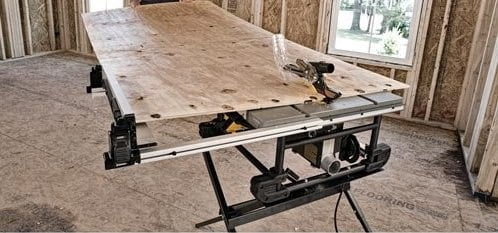


If you do any type of contract work or plan on remodeling a rental property or vacation home, a portable table saw is an essential tool. Job site table saws allow you to trim stock to width, plus make angled cuts with a miter gauge.
Some even allow for beveled cuts, if equipped with an adjustable saw blade. Paired with a miter saw, you’re ready for most trim work. So now you’ve invested in the saw; how do you use it? Keep reading for our all-inclusive guide on how to use jobsite table saws.
Step by Step Guide for Using a Jobsite Table Saw
[tcb-script async=”” src=”//pagead2.googlesyndication.com/pagead/js/adsbygoogle.js”][/tcb-script][tcb-script](adsbygoogle = window.adsbygoogle || []).push({});[/tcb-script]
Pick the Right Saw
If you’re planning on using a portable table saw, make sure it’s the right option for you. While portable table saws have come a long way in recent years, they still aren’t as stable, nor do they offer the power of a traditional table saw.
If it’s possible to use a saw in one location and transport cut the stock to the job site, do so. If you must have a table saw at a job site, then a portable table saw might be for you. These saws come in a few different forms.
Some are equipped with wheels, to be rolled to a work site, while others are designed to sit atop a work table. Most portable table saws weigh in the range of a hundred pounds and cost a few hundred dollars equipped with a 10-inch blade.
Learn about the features on your saw
A job site table saws may come equipped with several features. Blade guards cover the blade to protect hands, and arms and legs for that matter, from the sharp teeth of a saw. Modern blade guards retract as the stock is fed into the spinning blade.
T-slots allow a miter gauge to slide in a straight line in order to make angled cuts. Most modern table saws, portable or otherwise, are equipped with a bevel gauge beneath the table; turning a wheel changes the angle of the blade relative to the table. Sliding outfeeds effectively increase the distance of the table from the back of the blade. This adds much-needed stability when cutting long pieces of stock.
Safety first
As we’ve mentioned before, safety is our number one priority on any job site. It should be yours, too. Any time you’re near a sharp spinning blade, it’s best to take a few extra moments to set your saw up for maximum safety. Always keep the blade guard on.
A splitter sits behind the table saw blade and keeps ripped scrap from angling back towards the blade. A rub stick pushes stock tight to the fence, minimizing the chance of binding the saw blade or making less-than-straight cuts.
Push blocks are plastic handles that serve to push the stock through the saw, keeping hands and fingers away from spinning blades. Use vacuums to remove accumulated sawdust; in some cases, vacuums can be fitted to saws to pull the sawdust while the saw is running.
Add a Table or Rollers
[tcb-script async=”” src=”//pagead2.googlesyndication.com/pagead/js/adsbygoogle.js”][/tcb-script][tcb-script](adsbygoogle = window.adsbygoogle || []).push({});[/tcb-script]

One of the most important safety features adds stability to your job site table saw. Building a table that sits behind your saw and is the same height, or a bit lower, is a great way to reduce stress on both you and the saw.
The length of the table needs to be close to the length of the longest pieces you’ll be cutting. The table holds the wood stable as it passes through the saw, preventing you from fighting to hold the wood down as you make cuts.
If a table isn’t available, there are commercial rollers that will serve the same purpose, though they offer far less stability. It’s best to have several rollers spaced behind the table in order to catch stock after it passes the blade.
How to make cuts lengthwise
Using a table saw isn’t particularly complicated, provided all safety measures have been taken. Make sure that you have a straight, clean working edge on the stock you plan to cut. If necessary, use a joiner to cut a straight edge into the piece of stock Adjust the rip fence to the desired width.
Place the piece of stock with the straight against to fence. Place a rub stick on the table to assist keeping the stock tight to the fence. Turn the saw on. Using push blocks, push the wood towards the spinning saw blade. Stand to which ever side feels more comfortable.
As you near the end of the cut, take special care around the blade, using a push stick to pass the wood through the blade. Walk around the saw to collect both pieces of the saw from the table or rollers.
Use a Miter Gauge
[tcb-script async=”” src=”//pagead2.googlesyndication.com/pagead/js/adsbygoogle.js”][/tcb-script][tcb-script](adsbygoogle = window.adsbygoogle || []).push({});[/tcb-script]

In some cases, you’ll need to make angled cuts with your table saw. If this is the case, slide the miter gauge into the T-slot and adjust to the appropriate angle. Clamp or screw the piece of stock to be cut to the miter gauge.
Before turning the saw on, make a pass to ensure you have the proper amount of clearance and that the saw won’t hit any bolts, clamps, or screws. If everything looks good, return the miter gauge to its starting position, turn on the saw, and cut as usual.
Conclusion
A table saw is an incredibly useful tool for any home improvement project. I sincerely hope that this tutorial helps flatten your learning curve. Did you find this quick tutorial useful? If you did, please comment down below. If there’s anything you’d change or add, I’d love to hear about it. What projects have you completed using a table saw? Again, let me know down in the comments below.
